Basic Steps
Publish & Site History
Please preview your website before publishing it. You can preview your site by clicking the Preview button. Click Publish will perform both Save and Publish actions.

You can view and restore any version of the site you have saved or published by the following steps:
1. Click Site at the top menu.
2. Site History.
3. Click the version you wish to view.

4. Click Restore to restore your site to that version.

Favicon
Favicon is an icon showing at a web browser which is a 16 x 16 pixels JPG/PNG image.
Before editing the favicon, you must connect domain for your Wix site first.
-
Click Settings at the top menu.
-
Click Favicon.
-
Click Upload Favicon.

4. Select an image or click Upload Images to upload one from your computer.
5. Click Apply.
Related Guide:
Tracking & Analytics
Before using Tracking Tools & Analytics, you must connect domain for your Wix site first.
There are several Tracking & Analytics tools compatible with Wix:
1. Go to Dashboard
2. Click Marketing & SEO.
3. Click Marketing Integrations.
4. Click Connect, follow the steps to connect the tools.

To use Google Analytics to track the usage of a Wix site,
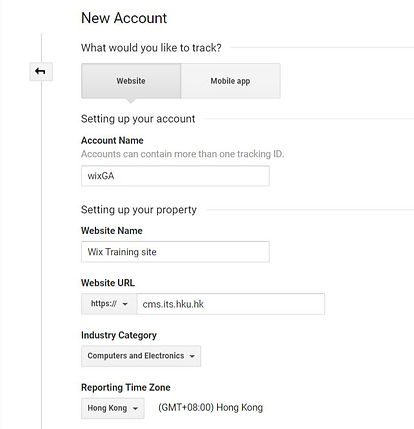
1. Create a new Google account or use an existing Google Account.
2. Visit Google Analytics.
3. Click Admin.

4. Click + Create Account

5. Input Account Name, Website Name and Website URL (change http:// to https://) and update the Time Zone to Hong Kong.
6. Click Get Tracking ID at the end of page.

7. Check the terms and click I Accept.
8. A Tracking ID in the format of UA-123456789-1 will be generated. Please put that in your Wix site.

To use Google Analytics in Wix
1. Visit your Site Dashboard.
2. Click Manage Site.
3. Click Tracking & Analytics.

4. Click + New Tool.
5. Click Google Analytics.

6. Input the Tracking ID generated from Google Analytics.
7. Select the IP Anonymization checkbox to ensure that Google does not save your site visitors' IP addresses.
8. Click Apply.

SEO
Search Engine Optimization (SEO) is to make your site rank high in the search engines (e.g. Google). This function requires domain connection.
-
Go to Dashboard.
-
Click Marketing & SEO > Get Found on Google.

3. Click Start Now
4. Input your site name
5. You will be prompted to input 5 keywords to create your personalized SEO plan.
6. Follow the instructions to complete step 1 (login using a Google account for registering the Google Search Console), steps 2 and 3.

Note:
It may take a few weeks for Google Search to propagate the contents of new or updated websites.
For revamped websites using the original domain name, you can reference to this user guide to create redirection from old URL to new URL. For revamped websites using a new domain name, please contact the web administrator of the previous website to set up a redirection. You may reference to this user guide for the html redirection code.
Related Guide:
Ongoing Maintenance
After your website is assigned with a Premium Plan and is connected with a domain ending with .hku.hk via CF83 - Application for Cloud-based Website Content Management System (CMS) and WordPress CMS, you can request ITS to add/edit/remove custom role(s), duplicate site or delete site for your department via the same application form, CF83 by filling out the section on Ongoing Maintenance of Wix Site.